This is not a toolbox talk, this is the real thing. Toolboxes have been in the firing line in the food industry for years because none are very hygienic. There are factories where toolboxes are banned on the production floor and tradesmen have to carry their tools in a plastic bag. Those tradesmen are not impressed (and it is not the way to make friends with the technical guys). So here is the story of why, and how, a truly hygienic toolbox finally came about.
In the seventies, most of us ‘techies’ did our stint in the army. Most of us were at the start of our careers and a decent toolbox was pretty high on our priority list. When we saw our first ‘five o’ Browning ammo box the possibilities were obvious. Therefore most of us ‘organised’ to get hold of a box and took it home. This set the basic principle of compact.
From that humble beginning the toolbox has gone through a process of evolution to the point where it is today. The modified ‘ammo box’ still rides in the back of my vehicle today after more than 40 years. But now it is awesomely compact and practical, as it has gone through many stages of evolution through all those years.
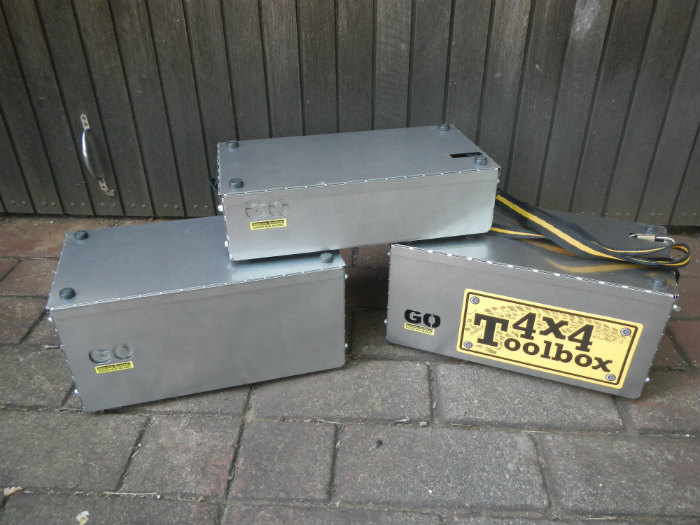
This is what it looks like now!
Because of demand from friends and customers, I decided to start building them commercially. Having been in the food industry for most of my working life, it dawned on me that there is not a specific toolbox on the market which has been designed with hygiene in mind, but this toolbox of mine is already somewhat hygienic by design. Thus started the evolution to make it as hygienic as possible. This was a new and interesting perspective to consider for toolbox design, and some rather unique and innovative little changes came about. But first, the unhygienic points had to be identified first and then eliminated.
How successful can such a design really be ? This toolbox
is such that if you unpack it and have all the removable parts
removed, it can be properly washed clean in any
normal dish washer without any ill effects.
For the hygiene guys, I will go into some of the detail here, as it was a fresh learning process for me and I will gladly share it. These points will provide you with a good list of what to look for during your next toolbox inspection.
What to look for in a Toolbox Inspection
- SURFACE FINISH was an obvious departure point. Painted surfaces are often not the most hygienic. It could have a rough surface (some at microscopic level) that is not easy to clean. It will most probably have a paint that is not approved as food safe. It is also, more often than not, a rather cheap paint that allows easy damage which leads to peeling paint and rust. Peeling and rust are not acceptable and a rusted surface will harbour lots of dirt because of the microscopic holes.
Solution: Use stainless as it gives an easy cleaning surface and is rust free. (Please note that this statement may not always be true. You can have circumstances where a higher grade stainless is required. This is an optional extra.) Stainless is also a colour that makes it easy to spot dirt.
Basic Principle: consider the toolbox surface finish
- HINGES are a good breeding place for the nasties. Conventional designs all work on a pin that fits in a tube. This is quite small with minimal clearances. It is all but impossible to clean inside these small spaces. Quite often these will either harbour rust or oil, both of which present possible contamination issues. Next time you look at a toolbox, do a close inspection of this culprit and you will have to agree - it is normally a loose item that is fixed mechanically to the box. All the traditional fixing methods will create two surfaces that are clamped together and will never form a perfect fit. This immediately creates a small space that is impossible to clean. It quite often is not painted between the surfaces and is an excellent starting point for rust. Some hinges are bolted on and the bolt nut and holes where they fit in all create small spaces that are also impossible to clean.
Solution: Design it out of the toolbox - no add-on hinges or bolts; no pins and tubes, hollow bodies or sharp crevices. Because the design integrates the hinges into the toolbox base and is made of stainless steel, it has none of these undesirable features.
Basic principle: no small cavities or paint, and a smooth easily cleanable surface.
- CATCHES AND LOCKS. The same basics apply as for the hinges above (except that it is normally even worse).
Solution: Design it out of the toolbox - no add-on hasp and staple, catch, lock or bolts; no pins and tubes. Because the design integrates the catch into the toolbox base and is made of stainless steel, it has none of the undesirable features. It locks with a standard padlock. (Inspect one in detail and decide for yourself whether you can allow that into your system.)
Basic principle: no small cavities or paint and a smooth easily cleanable surface. Check all locks for risk.
- NOOKS AND CRANNIES are very prominent in most toolbox designs. The word ‘box’ says it all. A box has at least eight ‘long’ corners (a fold in the plate), and then the really bad areas are the corners where three of these folds come together. The sharper the bends are, the worse they become. The outside is a risk, because the paint wears off and rust starts. The inside is a risk because this is where dirt gets an easy foothold.
As a matter of fact, this toolbox has forty ‘long’ corners (which is pretty standard on any good toolbox) and that could result in a lot of accumulated dirt.
Solution: Design the dirt foothold out of the toolbox. No closed corners exist in this design. The design opens up these corners and makes them easy to clean.
- JOINTS are the next issue. Because of economics and practicality most boxes have joints as part of their design. Some manufacturers weld these corners to eliminate the mechanical joint. (Beware of the quality of the weld on the inside, it is often rough with microscopic cavities.) Others have a flap on the first plate bent to ninety degrees and then fix the second plate to that by means of spot welding, rivets or bolts. The flap creates the biggest problem as it creates a fairly large area where the plate and the flap are right up against each other. This is not sealed and creates a really nice space for the nasties to breed – and it cannot be cleaned successfully. The second culprit in this area is the rivet or bolt. It is full of small cavities and hiding places that simply cannot be reached.
Solution: Design the problem out. This toolbox uses the ‘flap’ design, still with the ‘open’ corners; no bolts or rivets are used. Consulting with Pratley’s, our local experts and world leaders in epoxies, I found an inert epoxy that successfully joins these two surfaces and seals it at the same time. (By the way, Pratley’s was the only South African company that supplied something for the first moon landing.)
- BONUS FEATURES
- The open design of all corners has the added benefit that it cannot hold fluids. It is so open that even dust and small pieced of dirt will work its way out of the box, which in effect is a self-cleaning feature. This is important because liquid is normally the biggest culprit as far as contamination and proliferation of the nasties are concerned.
- The design of this toolbox is such that if you unpack it and have all the removable parts removed, it can be washed clean in any normal dish washer without any ill-effects.
- It is supplied with a carry strap, finger protectors and rubber feet to enhance the user-friendly practicality. In some highly sensitive areas you may want to remove this to further improve hygiene. (Please only enforce this if absolutely critical, as the technical guys will curse you every day).
These toolboxes are made to order, available in two sizes and can also be built to special requirements. Demonstrations can be arranged.
Visit www.geesmo.co.za for detail or mail enquiries to info@geesmo.co.za